8. Arm Detail Page
The Arm Detail Page provides a summary of a Study/Project/Arm of that belongs to a Program that participates in your data sharing platform.
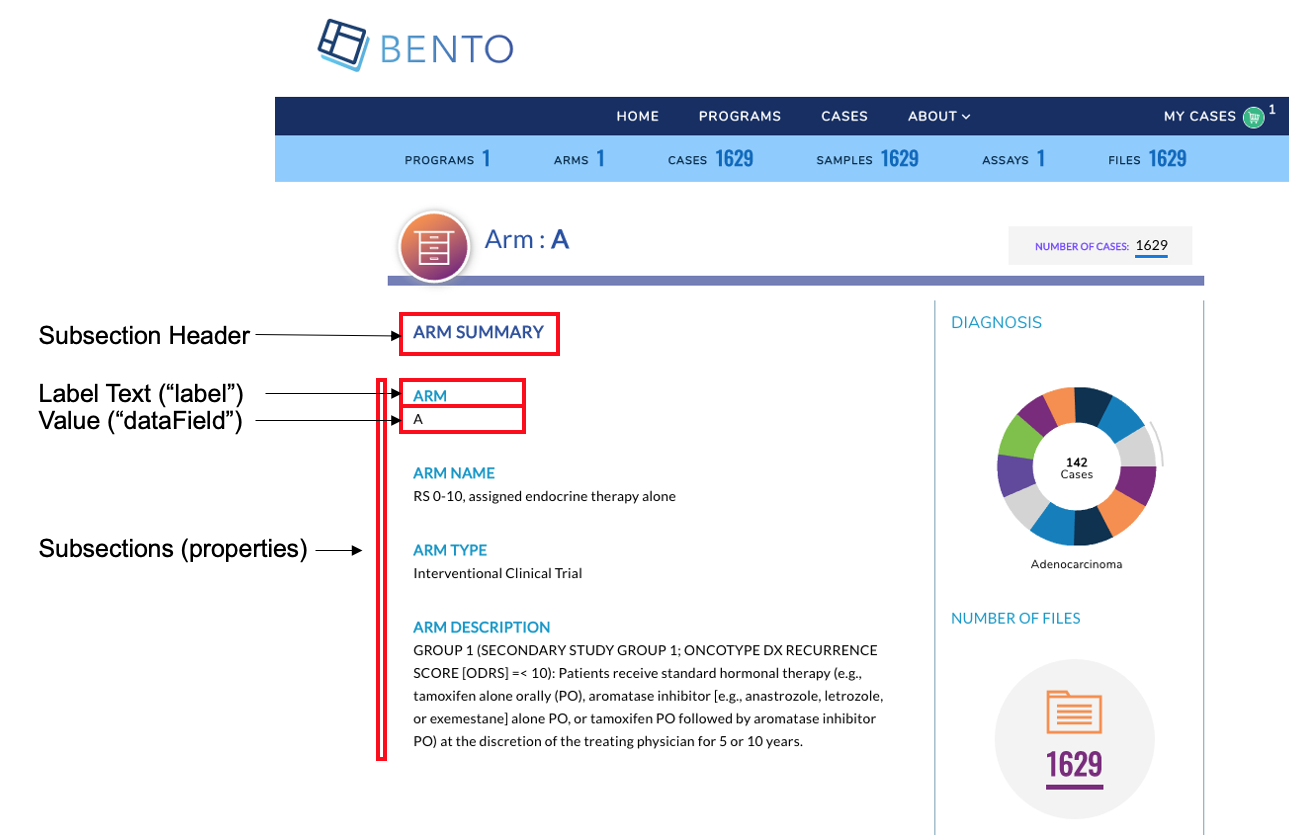
Arm Detail Page. Displayed are the configurable components of the Arm Detail Page.
8.1. Prerequisites
The files that specify the configuration parameters of the Arm Detail Page are stored in the GitHub
https://github.com/CBIIT/bento-frontend(representing your GitHub username asYOUR-USERNAME). Create a local clone of your fork into a local directory, represented in these instructions as$(src).Configuration Parameters for all Arm Detail Page elements can be specified in the file:
$(src)/bento-frontend/blob/master/src/bento/armDetailData.js.All images and icons that you use in your Bento instance should be accessible via a public url.
Please review the list of GraphQL queries to select query type(s) that return your data of interest.
8.2. Configuring the Arm Detail Page
The Arm Detail Page allows you to add key arm attributes as label value pairs within a set of subsections(See Step 3. below). A maximum of 6 sections can be added to the Arm Detail Page. Within each subsection a maximum of 10 attributes can be displayed as label:value pairs.
The Arm Detail Page also allows you to add an optional table to list Arm level entities.
Open the file
$(src)/bento-frontend/src/bento/armDetailData.js.Under
header:Set the field
labelto the display label for your Arm Detail Page.Set the field
dataFieldto the GraphQL API query that returns the value, such as the Arm Name or Arm ID that you want to display.
Under
subsections:For each label:value pair that you wish to display, create a object {label: ,datafield: ,} in
properties:Set the field
labelto the display label for your attribute.Set the field
dataFieldto the GraphQL API query that returns the data to be displayed as value for the given label:value pair.You can embed an optional link in your label or your value, or both. Links can be internal or external.
To add a link to your value specify an internal or external link by adding a
linkattribute to your object.To add a link to your label specify an internal or external link by adding a
labelLinkattribute to your object.
Add the GraphQL API query field to
GET_ARM_DETAIL_DATA_QUERY.
:warning: WARNING: If more than 6 subsections are configured, only the first 6 subsections will be displayed in the UI, other subsections will be ignored.
:warning: WARNING: If more than 10 properties are configured, only first 10 properties will be displayed in the UI, other properties will be ignored.
8.3. Configuring the Arm Detail Page Table
You can add a table to the Arm Detail Page. This is optional.
Open
$(src)/bento-frontend/src/bento/armDetailData.js.In
table:
The
displayfield is set to true, by default. Set this field to false if you do not wish to display a table in the Arm Detail Page.Set the field
titleto the the title of your table.Set the field
dataFieldto the name of the GraphQL API query being used to return data for the Arm Detail Page. Note: This query should match the GraphQL API query inGET_ARM_DETAIL_DATA_QUERY.Set the field
defaultSortFieldto the name of the query field that will be used to sort the Arm Detail Page Table. Note: this query field should be displayed as one of the columns in the Arm Detail Page Table.Set the field
defaultSortDirectionto the sort order of your choice. Valid values are ‘asc’ (ascending) and ‘desc’ (descending).Add your GraphQL API query to
GET_ARM_DETAIL_DATA_QUERY.
Example:
...
const table = {
  display: true,
  title: '<Table Title>',
  dataField: '<GraphQL API query returning data for this page.>',
  defaultSortField: '<GraphQL API query field used to sort the table.>',
  defaultSortDirection: '<sort order, asc|desc>',
 ...
const GET_ARM_DETAIL_DATA_QUERY = gql`{
  '<Your GraphQL query>'' {
    '<Data fields returned by your GraphQL API query>'
  ...
 }
}
8.3.1. Adding columns to the Arm Detail Page Table
You can add up to 10 columns in the Arm Detail Page Table. If you add more than 10 columns, Bento will display the first 10 columns without an error or warning message. The top-down order of columns will be displayed left to right on the UI.
Open
$(src)/bento-frontend/src/bento/armDetailData.js.Under
table, add an object{dataField: , header: , link: ,}to thecolumnslist:
Set the field
dataFieldto the GraphQL API query data field that returns the data for the column.Set the field
headerto the column header name.Set the field
linkto an internal or external link that is to be embedded into the the column value. See below for additional instructions on adding internal and external links. Links are optional.Add your GraphQL API query data field to
GET_ARM_DETAIL_DATA_QUERY.
Example:
const table = {
  ...
  columns: [
    {
      dataField: '<GraphQL API query field returning data for this column>',
      header: '<Column Header>',
      link: '<link to be embedded in column value>',
    },
    {
      dataField: '<GraphQL API query field returning data for this column>',
      header: 'PubMed ID',
    },
    ...
  ],
};

const GET_ARM_DETAIL_DATA_QUERY = gql`{
  '<Your GraphQL query>'' {
    '<Data fields returned by your GraphQL API query>'
  ...
 }
}
8.3.1.1. Internal Links in the Arm Detail Page Table.
links starting with
/are considered as internal links.Internal links will be opened in the same tab.
Dynamic links can be generated by passing a valid table field to
{}. For example,/program/{program_id}will; link toprogram/NCT00310180.
8.3.1.2. External Links in the Arm Detail Page Table.
External links should start with
http://orhttps://.External links should show-up with
externalLinkIcon. Note: In this version of Bento the External Link Icon of the Arm Detail Page is not configurable.External link will be opened in a new tab.
Dynamic links can be generated by passing a valid table filed to
{}. For example,https://pubmed.ncbi.nlm.nih.gov/{pubmed_id}will link tohttps://pubmed.ncbi.nlm.nih.gov/29860917/
:warning: WARNING: You can add a maximum of 10 columns to the table. If you add more than 10 columns, Bento will display only the first ten columns, without any warning or error message
8.4. Configurating The “Associated Files” Table
This table lists files that are associated with the Arm. It can be configured as follows:
Open
$(src)/bento-frontend/src/bento/armDetailData.jsEdit the
tableobject :
display: Show or Hide column (must betrueorfalse)tableTitle: Text to show on table titlesubjectDetailField: field name in “Data” object to get values for table. Field name for files / Samples data, need to be updated only when using a different GraphQL querydefaultSortField: Value must be one of the ‘dataField’ in columns.defaultSortDirection: Sort default column in Ascending or Descending order (value must beascordesc)buttonText: Text to appear on Add to cart buttontooltipMessage: Help Icon Message.columns: a list of column objects. There is a maximum limit of 10 columns. If more than 10 columns are added, Bento will display the first 10 columns without an error or warning message. The top-down order of columns will be displayed left to right on the UI. Each column object is described by the following fields:dataField: specifies what data appears in the column, field must be from the GraphQL API queryheader: Heading Text for columnsort: sort order for column; must beascordescprimary: applies to primary field of table like “sample_ID” or “File_ID” based on which files will be added in to cart; must betrueorfalsedisplay: Show or Hide column; must betrueorfalsedataFromRoot: Get data from parent element; must betrueorfalselink: Hyperlink to internal or external page. The value can be injected in link dynamically using{datafield}, for example:// Internal Link link: '/arm/{dataField}', // External Link link: 'https://example.com/{dataField}',
8.4.1. Internal Links in the Dashboard Table.
links starting with
/are considered as internal links.Internal links will be opened in the same tab.
Dynamic links can be generated by passing a valid table field to
{}. For example,/program/{program_id}will link toprogram/NCT00310180.
8.4.2. External Links in the Dashboard Table.
External links should start with
http://orhttps://.External links should show-up with
externalLinkIcon.External link should be opened in a new tab.
Dynamic links can be generated by passing a valid table filed to
{}. For example,https://pubmed.ncbi.nlm.nih.gov/{pubmed_id}will link tohttps://pubmed.ncbi.nlm.nih.gov/29860917/
8.4.3. GraphQL Query
The GraphQL Query used for the Associated Files table is defined in GET_ARM_DETAIL_DATA_QUERY. For example:
// GraphQL query to retrieve detailed info for a case
const GET_ARM_DETAIL_DATA_QUERY = gql`
  query armDetail($study_acronym: String) {
    armDetail(study_acronym: $study_acronym) {
      study_acronym
      study_name
      study_type
      study_full_description
      study_info
      num_subjects
      num_files
      num_samples
      num_lab_procedures
      diagnoses {
        group
        subjects
      }
 `;
:warning: WARNING: You can add a maximum of 10 columns to the table. If you add more than 10 columns, Bento will display only the first ten columns, without any warning or error message