5. The Bento Landing Page
The Landing Page provides a visual and textual introduction to the overall mission of a Bento-based data sharing platform. This concise summary of the volume and diversity of available data entices users to learn more. A Bento Landing Page has several configurable components. See below for details.
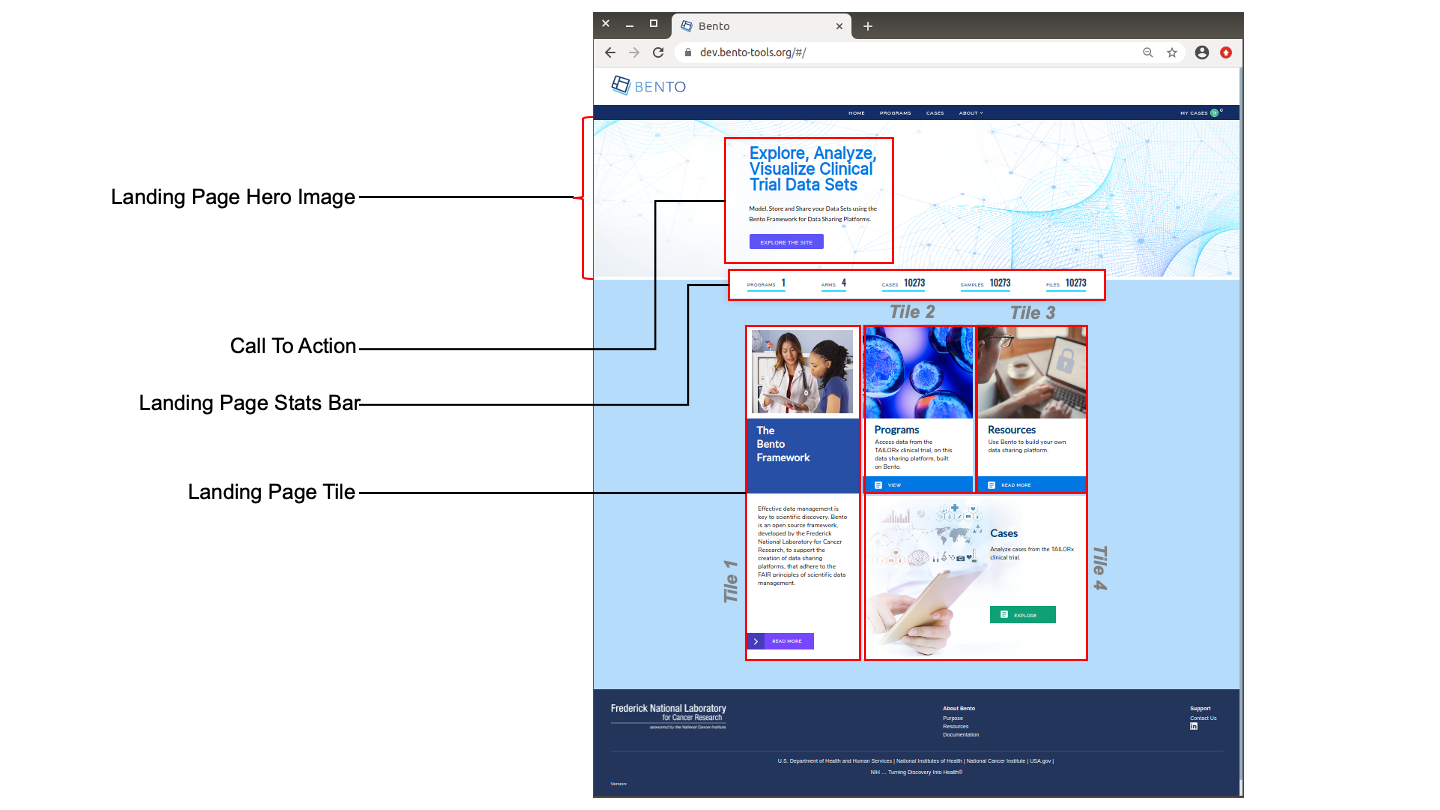
Landing Page Elements. Displayed are the configurable components of a Bento Landing Page. These are: Landing Page Hero Image, Call To Action, Landing Page Tiles, Landing Page Stats Bar. The Call To Action feature consists of a title, a descriptive section and a text button. Each of the four Landing Page Tiles consist of an image, a title, a descriptive section and a text button.
5.1. Prerequisites
The files that specify the configuration parameters of the Bento Landing Page are stored in GitHub
https://github.com/CBIIT/bento-frontend(representing your GitHub username asYOUR-USERNAME). Create a local clone of your fork into a local directory, represented in these instructions as$(src).Configuration parameters for all Landing Page Elements can be specified in the file:
$(src)/packages/bento-frontend/src/bento/landingPageData.jsAll images and icons used in a Bento instance should be accessible via a public url.
Please review the list of GraphQL queries to select query type(s) that return your data of interest.
5.2. The Landing Page Hero Image
The Landing Page Hero Image is a visual representation of the mission of the data sharing platform.
5.2.1. Configuring the Landing Page Hero Image
Open the file
$(src)/packages/bento-frontend/src/bento/landingPageData.js.Under
landingPageDataSet the field
landingPageHero.imgwith the URL to the Landing Page Hero image to be displayed.Set the field
landingPageHero.altwith the alt text to be associated with the Landing Page Hero image.
Example:
export const landingPageData = {
 ...
 landingPageHero: {
   alt: '<Your Alt Tag>',
   img: '<URL for your Landing Page Hero Image>',
 },
 ...
 }
5.3. Call to Action
The Call to Action feature provides a concise summary of what an end user can accomplish within the data sharing platform.
5.4. Configuring the Call to Action Feature
Open the file
$(src)/packages/bento-frontend/src/bento/landingPageData.js.In
landingPageData:Set the field
callToActionTitleto the Call To Action Title.Set the field
callToActionDescriptionto the Call to Action Descriptive Text.Set the field
callToActionButtonTextto the label for the Call To Action button.Set the field
callToActionButtonLinkto the link to be embedded in the Call To Action button.
Example:
export const landingPageData = {
  callToActionTitle: '<Your Call To Action Title>',
  callToActionDescription: '<Your Call To Action Descriptive Text>',
  callToActionButtonText: '<Your Call To Action Button Label>',
  callToActionLink: '<Your Call To Action Embedded Link>',
  ...
  }
5.5. Landing Page Tiles
The four Landing Page Tiles provide additional visual and textual description of the mission and capabilities of a data sharing platform (see figure above for tile numbering). Note that in this version of Bento, the number, position and dimensions of these tiles cannot be configured.
5.5.1. Configuring the Landing Page Tiles
Open the file
$(src)/packages/bento-frontend/src/bento/landingPageData.js.Under
landingPageData, for a tile,tile<i>:
Set the field
tile_i.titleTextto the Tile Title.Set the field
tile_i.descriptionTextto the Tile Description.Set the field
tile_i.imgto the URL for the tile image.Set the field
tile_i.altto the ALT tag for the tile image.Set the field
tile_i.callToActionTextto the Call To Action text.Set the field
tile_i.callToActionLinkto the Call To Action embedded link.
For example, to edit properties of tile3:
export const landingPageData = {
  ...
  tile3: {
    alt: '<ALT tag for tile>',
    img: '<Link to image>',
    titleText: '<Tile title>',
    descriptionText: '<Tile description>',
    callToActionText: '<Tile Link Label>',
    callToActionLink: '<Tile Link>',
  },
  ...
};
5.6. Landing Page Stats Bar
The Landing Page Stats Bar provides the end user with a high-level overview of the volume and diversity of the available data. Summary counts are displayed for up to five major data entity types. Bento allows a maximum of 5 summary statistics. If more than 5 are added, only the top 5 will be displayed without any warning or error message.
5.6.1. Configuring the Landing Page Stats Bar
Open the file
$(src)/packages/bento-frontend/src/bento/landingPageData.js.Under
landingPageDatastatistics can be added to the landingPageStatsBar.Set the field
statTitleto the label to be displayed for each statistic.Set the field
statAPIto the GraphQL API query that returns each statistic of interest.Add the GraphQL query to
GET_LANDING_PAGE_DATA_QUERY.
Example:
export const landingPageData = {
...
  landingPageStatsBar: [
    {
      statTitle: '<Your Statistic Label',
      statAPI: '<Your GraphQL API query>',
    },
    ...
    ]
  }

export const GET_LANDING_PAGE_DATA_QUERY = gql`{
  '<Your GraphQL API query>'
  ...
  }
5.7. Suggested Best Practices
Dimensions of Landing Page Hero image: 1200x500 pixels
Dimensions of Tile 1, Tile 2 and Tile 3 images: 293x349 pixels
Dimensions of Tile 4 image: 600x 436 pixels
Image resolution >= 72 ppi and image format: PNG
The “Call To Action” title should be limited to a maximum of 60 characters.
The “Call to Action” description should be limited to a maximum of 150 characters.
The Tile title should be limited to a maximum of 60 characters.
The Title description should be limited to a maximum of 150 characters.
The Title’s button title should be limited to maximum of 12 characters.
Alt tags should be short (maximum limit =125 characters). You may add multiple, comma-separated key words in the Alt tag.